Tuesday, September 29, 2009

Rolled Chicken Breasts

Because you really can't call them stuffed. They're not.

4 straight meals later, Doug and I have consumed all 3 lbs of turkey chili. That is embarrassing. BUT it allowed to me discover this delicious "stuffed" chicken.

Recipe here (with my modifications below):

Chicken Stuffed with Artichokes, Lemon and Goat Cheese -- Heather Averett, Cooking Light; The Essential Dinner Tonight Cookbook - Oxmoor House - 2009
4 boneless skinless chicken breasts, pounded to 1/4 of an inch thick

2.5 tablespoons breadcrumbs

2 teaspoons lemon zest

1/4 teaspoon salt

1/4 teaspoon ground black pepper

1 (6 ounce) jar marinated & drained artichoke hearts, chopped

1 (3 ounce) package goat cheese
Cooking spray


Mix all ingredients but chicken and cooking spray. Spread over pounded chicken, roll chicken and secure with toothpicks. Heat large nonstick skillet, coat with cooking spray. Add chicken to pan, cooking 3 minutes on each side. Put entire skillet in the over at 375 degrees for 15 minutes, or until chicken is done.

I replaced the breadcrumbs with almond meal. Breadcrumbs were pretty much for texture here anyway so might as well replace with something healthy. Almond meal is obviously ground almonds, but the cool thing is that the oil has been pressed out - so most of the calories are gone but the nutrition content of the almond is left behind. Here are all my ingredients (stuffing already mixed):


You can see the almond meal bag in the back - and if you're wondering where you can get some of this awesome stuff...Trader Joes! Of course! I didn't have toothpicks, so I used some twine type stuff. I also decided that the chickens needed some breading, so I busted out my pastry brush and brushed them with diluted egg and rolled them in almond meal. I also used 1 tablespoon of olive oil instead of the cooking spray. Olive oil isn't really bad for you - it belongs in the same category as avocados or most nuts. A healthy fat with high nutrition content - but super high in calories and therefore should be consumed in moderation. 1 tablespoon was plenty to cover my pan.


Aren't they cute? More importantly (which you can't tell from the picture), they were delicious. I served with rice pilaf and some salad. Great weeknight dinner! I can't quite call my rolled chicken core diet friendly, because of the dairy. Boohoo. BUT they are gluten free with the almond meal substitution, so store this one away for your gluten free friends!

A word about diet

Despite what the name of my blog suggests, I do like to follow a healthy diet. Of course, there are always going to be exceptions since I loooove to bake and a life without cookies is no life at all. But in general, I try to follow a modified core diet (explains the "Core" label for the recipes). This means that you can't eat any processed foods and therefore your diet is based around lean & hormone free meats, fruits, vegetables, nuts, specific yogurts, cottage cheese & healthy oils (yup, no bread). The idea is that you are eating foods with a high nutrition density, therefore keeping you full longer and at the end of the day you've consumed less calories. It also keeps your blood sugar stable and doesn't cause you to crash mid afternoon post lunch (and yes, the difference in energy is noticeable). However, you have a window before and after workouts that it is OK to eat carbs, because you need some sugar to burn off. This window is an hour before a workout, and the window after a workout should be as long as the workout was. So, if I run for 90 minutes, I can eat my turkey sandwich any time within 90 minutes after my run. This doesn't mean if you "at" the gym for an hour, you have an hour afterward to go bonkers. Be smart with it! Again, I follow this diet loosely. If I really want a sandwich (can you tell I like sandwiches?), I'll have a sandwich because hey - I work out enough and I'm no professional triathlete/runner. But I try to make healthy substitutions when I can in cooking. I'll always highlight these substitutions in my recipes.

Sunday, September 27, 2009

Pie and Chili

Sunday is my cook-for-the-whole-week day, much to the delight of my boyfriend Doug and kinda creepy Whole Foods check out man I always seem to get. Tonight? Chili and blueberry pie! Random? Yes.


Recipe below. I usually double or triple the recipe. Tripling is usually due to the Doug factor.

Chili Con Carne -- Craig Claiborne, New York Times Cookbook, Harper and Row, 1961

3 Tablespoons butter or olive oil
(I use Olive Oil, which makes this a core diet recipe! also - I never use 3 whole tablespoons per pound...that is pretty excessive)
1 large onion, minced

2 cloves garlic, minced

1 pound chopped beef
(I use ground turkey or chicken - healthier!)
3 cups water
1 and 1/3 cups tomatoes

1 green pepper, minced
1/2 tsp. celery seed

1/4 tsp cayenne

1 tsp. cumin seed
crushed
1 small bay leaf
2 Tablespoons chili powder
1/8 tsp. basil

1 and 1/2 tsp. salt (
I never add this much, I do around half. The rest of the spices give it plenty of flavor!)

1. Heat the butter in a skillet, add the onion and garlic and saute until golden brown. Add the meat and brown. 2. Transfer the meat mixture to a large saucepan and add the remaining ingredients. Bring to a boil, reduce the heat and simmer, uncovered, until the sauce is as thick as desired, or about three hours. If desired, add one can of kidney beans just before serving. (No transferring from skillet to saucepan here...I make the whole thing in a Dutch oven, which you can see in the picture. I'm naturally messy enough, so I have plenty to clean at the end of the day...no extra dishes for me, please!)


Dessert? Blueberry pie - I was dying to try out my new pie making skills. I used Leslie's pie crust recipe, but below is the recipe from Cooks Illustrated (the best $3 you'll spend each month). This is the filling I used.


Makes one 9-inch pie. Published July 1, 2008. From Cook's Illustrated.

Ingredients

Foolproof Pie Dough (I used Leslie's pie crust recipe, but I have tried this one as well, and it was very good. The Vodka was an interesting experiment)
2 1/2 cups unbleached all-purpose flour (12 1/2 ounces), plus more for work surface
1 teaspoon table salt
2 tablespoons sugar
12 tablespoons cold unsalted butter (1 1/2 sticks), cut into 1/4-inch slices
1/2 cup vegetable shortening , cold, cut into 4 pieces
1/4 cup vodka , cold (see note)
1/4 cup cold water
Blueberry Filling (I used this filling recipe)
6 cups fresh blueberries (about 30 ounces) (see note)
1 Granny Smith apple , peeled and grated on large holes of box grater
2 teaspoons grated zest and 2 teaspoons juice from 1 lemon (This is too much lemon for me - I want to taste those blueberries! I used half the zest and juice and I thought it was perfect)
3/4 cup sugar (5 1/4 ounces)
2 tablespoons quick-cooking tapioca , ground (see note)

Pinch table salt
2 tablespoons unsalted butter , cut into 1/4-inch pieces

1 large egg , lightly beaten with 1 teaspoon water

Instructions

  1. 1. For The Pie Dough: Process 1 1/2 cups flour, salt, and sugar in food processor until combined, about two 1-second pulses. Add butter and shortening and process until homogenous dough just starts to collect in uneven clumps, about 15 seconds; dough will resemble cottage cheese curds and there should be no uncoated flour. Scrape bowl with rubber spatula and redistribute dough evenly around processor blade. Add remaining cup flour and pulse until mixture is evenly distributed around bowl and mass of dough has been broken up, 4 to 6 quick pulses. Empty mixture into medium bowl.

  2. 2. Sprinkle vodka and water over mixture. With rubber spatula, use folding motion to mix, pressing down on dough until dough is slightly tacky and sticks together. Divide dough into 2 even balls and flatten each into 4-inch disk. Wrap each in plastic wrap and refrigerate at least 45 minutes or up to 2 days.

  3. 3. Remove 1 disk of dough from refrigerator and roll out on generously floured (up to 1/4 cup) work surface to 12-inch circle, about 1/8 inch thick. Roll dough loosely around rolling pin and unroll into pie plate, leaving at least 1-inch overhang on each side. Working around circumference, ease dough into plate by gently lifting edge of dough with one hand while pressing into plate bottom with other hand. Leave dough that overhangs plate in place; refrigerate while preparing filling until dough is firm, about 30 minutes.

  4. 4. For The Filling: Adjust oven rack to lowest position, place rimmed baking sheet on oven rack, and heat oven to 400 degrees. Place 3 cups berries in medium saucepan and set over medium heat. Using potato masher, mash berries several times to release juices. Continue to cook, stirring frequently and mashing occasionally, until about half of berries have broken down and mixture is thickened and reduced to 1 1/2 cups, about 8 minutes. Let cool slightly.

  5. 5. Place grated apple in clean kitchen towel and wring dry. Transfer apple to large bowl. Add cooked berries, remaining 3 cups uncooked berries, lemon zest, juice, sugar, tapioca, and salt; toss to combine. Transfer mixture to dough-lined pie plate and scatter butter pieces over filling.

  6. 6. Roll out second disk of dough on generously floured (up to 1/4 cup) work surface to 11-inch circle, about 1/8 inch thick. Using 1 1/4-inch round biscuit cutter, cut round from center of dough. Cut another 6 rounds from dough, 1 1/2 inches from edge of center hole and equally spaced around center hole (this is a pain - fork punctures around the top work fine for me! You just need to let the heat escape somehow or else the crust will burst off the top....trust me :-) ). Roll dough loosely around rolling pin and unroll over pie, leaving at least 1/2-inch overhang on each side.

  7. 7. Using kitchen shears, trim bottom layer of overhanging dough, leaving 1/2-inch overhang. Fold dough under itself so that edge of fold is flush with outer rim of pie plate. Flute edges using thumb and forefinger or press with tines of fork to seal. Brush top and edges of pie with egg mixture. If dough is very soft, chill in freezer for 10 minutes.

  8. 8. Place pie on heated baking sheet and bake 30 minutes. Reduce oven temperature to 350 degrees and continue to bake until juices bubble and crust is deep golden brown, 30 to 40 minutes longer. Transfer pie to wire rack; cool to room temperature, at least 4 hours (I know it is hard, but waiting the full 4 hours will make it pie, not soup). Cut into wedges and serve.

Easy as Pie

On Saturday I took my first of three scheduled (well, so far) with Helen's Kitchen. This particular class was at pastry chef Leslie's house in Belmont. It was awesome!! Oh, the joy of tapering! This is the first time all summer I've had time to do something like this - I spend most Saturday mornings training. But, with the Chicago marathon looming in the near future, I spent a beautiful fall morning making pie with 8 strangers. What else would I be doing 2 weeks out??

She shared with us her pie crust recipe, which she has been perfecting for years. While I won't share her secrets with you (you'll have to take the class yourself) - below are pictures of the awesome things we made.


First item of the day? An apple galette. A galette is (apparently) a free form pie - you just arrange apple slices on rolled out pie dough, turn over the edges, and bake. Amazing simple and incredibly delicious.


Next item - a pear tatin. The pear was made on the stove in a saucepan in some caramel (just sugar and water) and then the pie dough was put over it. The whole saucepan was put in the oven, and after it has cooked and cooled, you flip the whole thing over. Pretty cool.


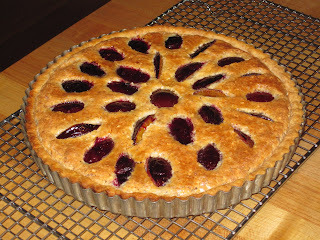
Then, we moved onto a plum frangipane tart. It is pie dough, and almond custard with plum slices. This might have been my favorite of the day...next time I'm figuring out how to incorporate raspberries!

We had to make a traditional pie while we were there! Peach pie, especially awesome since peaches are in their peak season right now.


We ate dessert before lunch...if you can call a quiche a lunch. This leek and gruyere quiche was great, next time I'm adding some ham!